El problema:
Step by step to help me to do it this way: I want to use Dynamic Content in Elementor (or Dynamic Tags) with the Advanced Custom Fields plugin. I need you to tell me how to add a custom field for each product that has its own url {$product_url} in the following whatsapp link:
https://api.whatsapp.com/send/?phone=YOUR_PHONE_NUMBER&text=estoy+interesa@+en+este+producto:{$product_url}&type=phone_number&app_absent=0.
Where {$product_url} is the URL of the product. I need it so that when I do the following steps it must work:
1. I go to Edit any page or template in elementor pro.
2. I add for example a header
3. I go to the link tab and add a dynamic ACF tag.
4. When I click again I will get the ACF fields inside which should be the whatsapp url automatically combined with the product url.
La Solución:
To create a dynamic WhatsApp link using Elementor Pro and Advanced Custom Fields, follow these steps:
- Create a new custom field group for the WhatsApp phone number:
- Go to Custom Fields > Add New in your WordPress admin dashboard.
- Enter a title for the field group, e.g., «Product WhatsApp Link.»
- Click «Add Field» and set the Field Label as «Phone Number» and the Field Name as «phone_number.»
- Choose the Field Type as «Text.»
- (Optional) Set the Placeholder text as «YOUR_PHONE_NUMBER>» or your desired phone number format.
- In the «Location» section, set the rule to «Post Type» «is equal to» «Product.»
- Click «Publish» to save the field group.
- Add the phone number to your products:
- Go to the product editing page in WooCommerce.
- Scroll down to the «Product WhatsApp Link» section.
- Enter the phone number you want to use for this product.
- Update the product.
- Create a new custom field group for the dynamic WhatsApp link:
- Go to Custom Fields > Add New in your WordPress admin dashboard.
- Enter a title for the field group, e.g., «Dynamic WhatsApp Link.»
- Click «Add Field» and set the Field Label as «WhatsApp Link» and the Field Name as «whatsapp_link.»
- Choose the Field Type as «Text.»
- Set the «Default Value» to the following, keeping «{$product_url}» as a placeholder that we will replace later:
https://api.whatsapp.com/send/?phone=YOUR_PHONE_NUMBER&text=estoy+interesa@+en+este+producto:{$product_url}&type=phone_number&app_absent=0 - In the «Location» section, set the rule to «Post Type» «is equal to» «Product.»
- In the «Location» section, set the rule to «Post Type» «is equal to» «Post.»
- Click «Publish» to save the field group.
- To replace the «{$product_url}» placeholder with the actual product URL, you need to add a filter to your theme’s
functions.phpfile:- Open your theme’s
functions.phpfile (or create a child theme and edit itsfunctions.phpfile). - Add the following code snippet:
add_filter('acf/load_value/name=whatsapp_link', 'replace_product_url_placeholder', 10, 3);

function replace_product_url_placeholder($value, $post_id, $field) {
    $product_url = get_permalink($post_id);
    return str_replace('{$product_url}', $product_url, $value);
}
- Open your theme’s
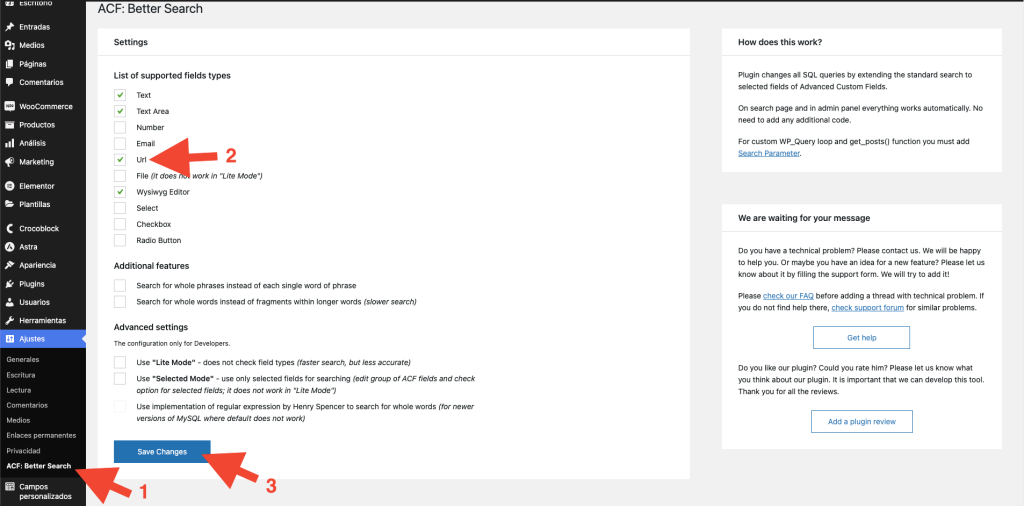
5. Install the «ACF: Better Search» plugin to enable searching for dynamic content with Elementor Pro:
- Go to Plugins > Add New in your WordPress admin dashboard.
- Search for «ACF: Better Search» and install and activate the plugin.
- Activate URL option in the plugin:
6. Edit the WooCommerce product template with Elementor Pro:
- Go to Templates > Theme Builder in your WordPress admin dashboard.
- Click «Add New» and choose «Single Product» as the template type.
- Click «Create Template» and choose a template or start from scratch.
7. Add a header or any other element that you want to link to the dynamic WhatsApp URL:
- Add a header element or any other element to the product page where you want the link to appear.
- Click on the element to open its settings panel.
- In the «Link» section, click on the «Dynamic» icon.
- Choose «ACF URL Field» from the list of dynamic tags.
- In the «Key» dropdown, select «whatsapp_link«.
8. Update the template and test the dynamic WhatsApp link on your product pages.
Now, the element you added will have a dynamic link to the WhatsApp URL with the product URL included. When a customer clicks on the element, it will open a WhatsApp chat with a pre-filled message containing the product’s URL.